Lettura elenco dei pacchetti... Fatto
Generazione albero delle dipendenze
Lettura informazioni sullo stato... Fatto
ca-certificates is already the newest version (20160104ubuntu1).
apt-transport-https is already the newest version (1.2.12~ubuntu16.04.1).
0 aggiornati, 0 installati, 0 da rimuovere e 3 non aggiornati.
Analysis
The apt-transport-https and ca-certificates packages were already installed.
The APT index it’s update also from the the new repos added.
Input
sudo apt-get purge lxc-docker
Output
Lettura elenco dei pacchetti... Fatto
Generazione albero delle dipendenze
Lettura informazioni sullo stato... Fatto
Il pacchetto "lxc-docker" non è installato e quindi non è stato rimosso
0 aggiornati, 0 installati, 0 da rimuovere e 3 non aggiornati.
Analysis
There was no need to purge the packet because it wasn’t already installed.
Lettura elenco dei pacchetti... Fatto
Generazione albero delle dipendenze
Lettura informazioni sullo stato... Fatto
linux-image-extra-4.4.0-36-generic is already the newest version (4.4.0-36.55).
È stato impostato linux-image-extra-4.4.0-36-generic per l'installazione manuale.
The following additional packages will be installed:
  linux-generic linux-headers-4.4.0-38 linux-headers-4.4.0-38-generic
  linux-headers-generic linux-image-4.4.0-38-generic
  linux-image-extra-4.4.0-38-generic linux-image-generic
Pacchetti suggeriti:
  fdutils linux-doc-4.4.0 | linux-source-4.4.0 linux-tools
Pacchetti raccomandati:
  thermald
I seguenti pacchetti NUOVI saranno installati:
  linux-headers-4.4.0-38 linux-headers-4.4.0-38-generic
  linux-image-4.4.0-38-generic linux-image-extra-4.4.0-38-generic
  linux-image-extra-virtual
I seguenti pacchetti saranno aggiornati:
  linux-generic linux-headers-generic linux-image-generic
3 aggiornati, 5 installati, 0 da rimuovere e 0 non aggiornati.
È necessario scaricare 68,5 MB di archivi.
Dopo quest'operazione, verranno occupati 296 MB di spazio su disco.
Continuare? [S/n] s
Scaricamento di:1 http://security.ubuntu.com/ubuntu xenial-security/main amd64 linux-image-4.4.0-38-generic amd64 4.4.0-38.57 [18,7 MB]
...
Configurazione di linux-image-generic (4.4.0.38.40)...
Configurazione di linux-headers-4.4.0-38 (4.4.0-38.57)...
Configurazione di linux-headers-4.4.0-38-generic (4.4.0-38.57)...
Configurazione di linux-headers-generic (4.4.0.38.40)...
Configurazione di linux-generic (4.4.0.38.40)...
Configurazione di linux-image-extra-virtual (4.4.0.38.40)...
Analysis
linux-image-extra-4.4.0-38-generic and linux-image-extra-virtual are now installed with all their dependencies.
Input
sudo apt-get update
Output
Basically it’s always the same…
Analysis
Updated the APT index again…
Input
sudo apt-get install docker-engine
Output
Lettura elenco dei pacchetti... Fatto
Generazione albero delle dipendenze
Lettura informazioni sullo stato... Fatto
The following additional packages will be installed:
  aufs-tools cgroupfs-mount git git-man liberror-perl libltdl7 patch xz-utils
Pacchetti suggeriti:
  mountall git-daemon-run | git-daemon-sysvinit git-doc git-el git-email
  git-gui gitk gitweb git-arch git-cvs git-mediawiki git-svn diffutils-doc
I seguenti pacchetti NUOVI saranno installati:
  aufs-tools cgroupfs-mount docker-engine git git-man liberror-perl libltdl7
  patch xz-utils
0 aggiornati, 9 installati, 0 da rimuovere e 0 non aggiornati.
È necessario scaricare 23,5 MB di archivi.
Dopo quest'operazione, verranno occupati 128 MB di spazio su disco.
Continuare? [S/n] s
Scaricamento di:1 https://apt.dockerproject.org/repo ubuntu-xenial/main amd64 docker-engine amd64 1.12.1-0~xenial [19,5 MB]
…
Elaborazione dei trigger per libc-bin (2.23-0ubuntu3)...
Elaborazione dei trigger per systemd (229-4ubuntu8)...
Elaborazione dei trigger per ureadahead (0.100.0-19)...
Analysis
Docker engine it’s now installed!
Input
sudo service docker start
Output
Nothing
Analysis
The docker service is started.
Input
sudo docker run hello-world
Output
Unable to find image 'hello-world:latest' locally
latest: Pulling from library/hello-world
c04b14da8d14: Pull complete
Digest: sha256:0256e8a36e2070f7bf2d0b0763dbabdd67798512411de4cdcf9431a1feb60fd9
Status: Downloaded newer image for hello-world:latest

Hello from Docker!
This message shows that your installation appears to be working correctly.

To generate this message, Docker took the following steps:
 1. The Docker client contacted the Docker daemon.
 2. The Docker daemon pulled the "hello-world" image from the Docker Hub.
 3. The Docker daemon created a new container from that image which runs the
    executable that produces the output you are currently reading.
 4. The Docker daemon streamed that output to the Docker client, which sent it
    to your terminal.

To try something more ambitious, you can run an Ubuntu container with:
 $ docker run -it ubuntu bash

Share images, automate workflows, and more with a free Docker Hub account:
 https://hub.docker.com

For more examples and ideas, visit:
 https://docs.docker.com/engine/userguide/
Analysis
It works! The hello world image was run successfully!
I don’t need to add a docker unix group because it was created during the install.
Input
sudo usermod -aG docker $USER
Output
Nothing
Analysis
The current unix user was added to the docker unix group.
After a logging out and in again I’m able to run docker without sudo like this:
Input
docker run hello-world
Output
Hello from Docker!
This message shows that your installation appears to be working correctly.

To generate this message, Docker took the following steps:
 1. The Docker client contacted the Docker daemon.
 2. The Docker daemon pulled the "hello-world" image from the Docker Hub.
 3. The Docker daemon created a new container from that image which runs the
    executable that produces the output you are currently reading.
 4. The Docker daemon streamed that output to the Docker client, which sent it
    to your terminal.

To try something more ambitious, you can run an Ubuntu container with:
 $ docker run -it ubuntu bash

Share images, automate workflows, and more with a free Docker Hub account:
 https://hub.docker.com

For more examples and ideas, visit:
 https://docs.docker.com/engine/userguide/
The file with the known hosts for the machine it’s /etc/hosts. It’s used in conjunction with DNS to resolve names into IP address.
The machine name it’s used to look back to 127.0.0.1 as well as localhost.
The hostname file
The file with the hostname it’s /etc/hostname. It contains just the hostname and it’s used around the system.
Wrapping it all up
We need to change all the occurrences of the current hostname with the hostname we want in the two files mentioned before.
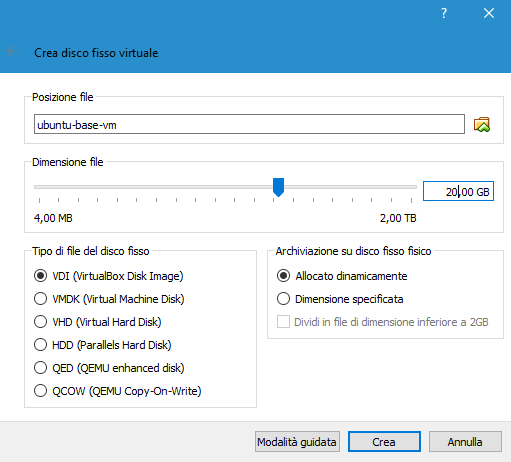
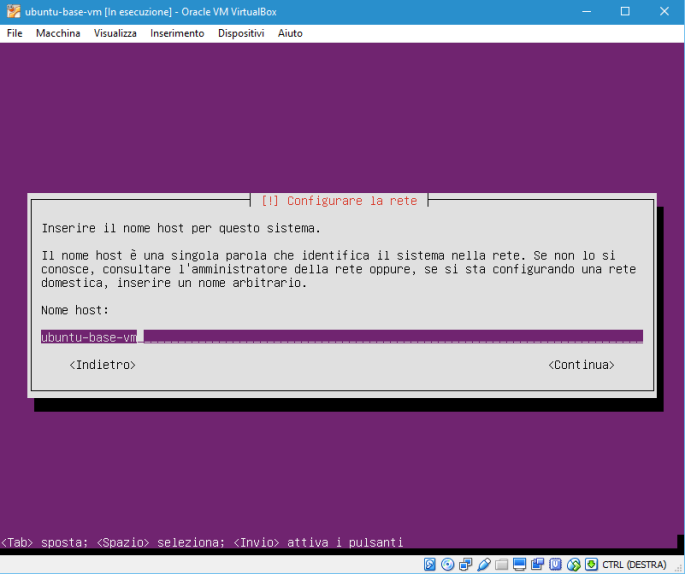
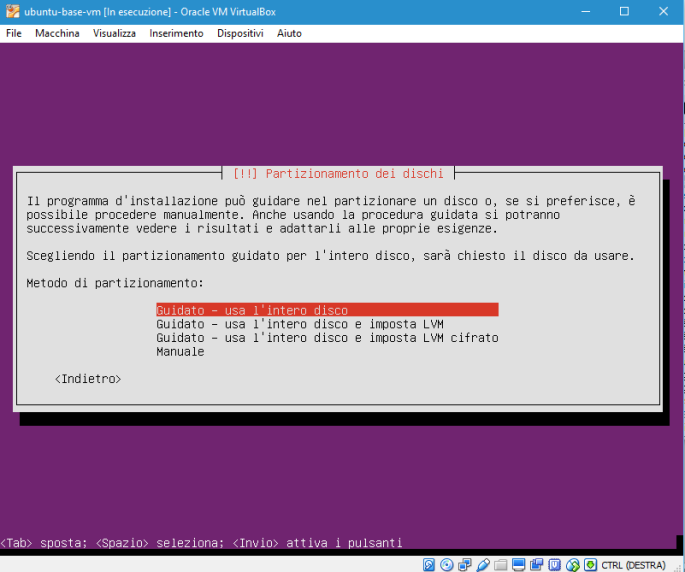
I want to change a clone of my ubuntu base VM image name from ubuntu-base-vm to ubuntu-docker.
Known hosts
The original /etc/hosts file:
This file contains bidirectional Unicode text that may be interpreted or compiled differently than what appears below. To review, open the file in an editor that reveals hidden Unicode characters. Learn more about bidirectional Unicode characters
This file contains bidirectional Unicode text that may be interpreted or compiled differently than what appears below. To review, open the file in an editor that reveals hidden Unicode characters. Learn more about bidirectional Unicode characters
The /etc/hostname file it’s pretty easy to edit because it contains just one line whith the hostname. So the original file:
This file contains bidirectional Unicode text that may be interpreted or compiled differently than what appears below. To review, open the file in an editor that reveals hidden Unicode characters. Learn more about bidirectional Unicode characters
This file contains bidirectional Unicode text that may be interpreted or compiled differently than what appears below. To review, open the file in an editor that reveals hidden Unicode characters. Learn more about bidirectional Unicode characters
Adding information about the IP address of a linux machine to the login prompt
Things to know
Getting the IP address
The IP address for the current machine can be obtained entering the following command:
hostname -I
Startup scripts
There are some default scripts run after particular events.
The one I want (after startup) it’s located in /etc/rc.local
Login prompt message
The login message it’s handled by the agetty command and documentation about it can be found using man agetty.
The agetty command displays and interprets the content of the /etc/issue file.
Mixing all this togheter
At startup I need to get the IP address of the machine and append it to the issue file to be printed out at the login screen.
First thing to do is to create a copy of the /etc/issue file.
This can be done with the command:
sudo cp /etc/issue /etc/issue.base
The next thing to do is to edit the /etc/rc.local file to:
gather the current IP address
copy /etc/issue.base back to /etc/issue
append to /etc/issue a new line with a string like IP address: xxx.xxx.xxx.xxx
This can be done editing the original /etc/rc.local that should look like this:
This file contains bidirectional Unicode text that may be interpreted or compiled differently than what appears below. To review, open the file in an editor that reveals hidden Unicode characters. Learn more about bidirectional Unicode characters
This file contains bidirectional Unicode text that may be interpreted or compiled differently than what appears below. To review, open the file in an editor that reveals hidden Unicode characters. Learn more about bidirectional Unicode characters
I’ve developed different projects with Java, git and Eclipse and I’ve come up with a .gitignore I use in my projects, it’s quite useful and it’s becoming more complete with time, so It’s something I just put it there and everything it’s fine committing.
Here it is:
This file contains bidirectional Unicode text that may be interpreted or compiled differently than what appears below. To review, open the file in an editor that reveals hidden Unicode characters. Learn more about bidirectional Unicode characters
Choose and configure a build automation tool for the project
There are various ways to write and compile a program in Java as in every other language.
You can simply create a class then call javac on the source code and java on the class to run it.
This is all fine and dandy, teaches the basics of how interpreted and compiled languages works and the steps needed to create something executable from just text.
Anyway, as the project you’re working on becomes more complex than a simple main method it’s much easier to manage it with a build automation tool.
This tools are useful because they minimize the chances of forgetting something (a machine does what it’s supposed to do instead of a human), and most of them also open up an opportunity to stand on the shoulders of giants, giving you automatic access to a huge library of already made open source projects to use as dependencies to solve problems people have already analysed, tested a kindly shared with the world.
Each one has its nice things and its weakness, the perfect one does not exist.
I’m pretty much familiar with Maven, I’m using it at work and makes a lot of sense, but I’m willing to try out Gradle, it’s a young tool, powered by a Domain Specific Language powered by the language Groovy.
Everybody it’s talking of it as the solution to all evil, so a look at it sure can’t hurt.
Cloning the repository on my local machine
The first thing to do is cloning the repository from github to my local machine.
I won’t focus on the procedure to install and configure or usage of git on any platform, it’s well detailed in the git documentation.
Let’s start actually adding something to this empty and lonely project 🙂
Let’s change directory into the project itself with
cd walk-stats
An easy way to start using gradle it using its wrapper so let’s configure the project to use it (again, I suppose you have a working installation of gradle on your machine, more information on how to install it can be found here).
I just want to create a Java class and a couple of test cases that fails and pass to have a basic structure for the project and get it compiled for the next steps.
Packages
The first way to keep the code readable it’s organizing it in packages, this helps understand where to find what you need and it helps also not having a horrible mess of files around in the main folder.
Now let’s create an empty Java Class and a JUnit test for it.
Here’s Application.java
This file contains bidirectional Unicode text that may be interpreted or compiled differently than what appears below. To review, open the file in an editor that reveals hidden Unicode characters. Learn more about bidirectional Unicode characters
This file contains bidirectional Unicode text that may be interpreted or compiled differently than what appears below. To review, open the file in an editor that reveals hidden Unicode characters. Learn more about bidirectional Unicode characters
I know, it’s pretty sad for the first time I wrote some code on this project, but now I’m ready to move on with the remaining phases for the configuration of the project.
Setting up a Continuous Integration testing service
Setting up a Continuous Integration testing service used to be a pretty demanding operation to do.
Luckily for everybody today services like Travis CI exists, they make a developer’s life much easier! (especially on open source code hosted on github 😉 )
To prepare the project to be under CI testing at each commit just sign in with your github credentials in Travis CI, click on the plus icon and flick the switch on the project.
The next thing to do is creating a .travis.yml and place it in the project root folder.
There’s actually not much about it apart from telling travis that this is a java project and that I wanted to use the oracle JDK version 8 to compile it.
Mine looks something like this:
This file contains bidirectional Unicode text that may be interpreted or compiled differently than what appears below. To review, open the file in an editor that reveals hidden Unicode characters. Learn more about bidirectional Unicode characters
The solution is to add to .travis.yml some pre build commands to set it executable, to make it look something like this:
This file contains bidirectional Unicode text that may be interpreted or compiled differently than what appears below. To review, open the file in an editor that reveals hidden Unicode characters. Learn more about bidirectional Unicode characters
Now the build still fails, but just because of the failing test I created!
This is what I call a success 🙂
Setting up a test coverage service
The next thing to do is setting up a test coverage service, it’s nice to know that your code is covered by tests, this gives you confidence in what you’re doing and prevents unwanted collateral regression.
First of all let’s remove the useless failing test from ApplicationTest because I don’t want my tests to fail for no reason anymore leaving just passingTest.
This file contains bidirectional Unicode text that may be interpreted or compiled differently than what appears below. To review, open the file in an editor that reveals hidden Unicode characters. Learn more about bidirectional Unicode characters
.travis.yml again to add a after_success phase to post the results to coveralls.
This file contains bidirectional Unicode text that may be interpreted or compiled differently than what appears below. To review, open the file in an editor that reveals hidden Unicode characters. Learn more about bidirectional Unicode characters
This file contains bidirectional Unicode text that may be interpreted or compiled differently than what appears below. To review, open the file in an editor that reveals hidden Unicode characters. Learn more about bidirectional Unicode characters
Basically the problem is due to the fact that the the gradlew wrapper file it’s not set as executable.
I liked more the solution of adding a before_install call to chmod +x on the file in question.
So from this .travis.yml
This file contains bidirectional Unicode text that may be interpreted or compiled differently than what appears below. To review, open the file in an editor that reveals hidden Unicode characters. Learn more about bidirectional Unicode characters
This file contains bidirectional Unicode text that may be interpreted or compiled differently than what appears below. To review, open the file in an editor that reveals hidden Unicode characters. Learn more about bidirectional Unicode characters
Sometimes you need to keep yourself busy doing something, so I decided to document the birth and evolution of my next project from the early beginnings to a working stage (hopefully).
I will develop an application to keep track and create statistics on walks I make around here when I have some free time.
There are already programs that basically do the same thing like map my walk, walk log and so on.
I know it’s not nice to answer a question with another one, but to the question why another one? I would simply answer, why not?
This could be an interesting project and I haven’t seen much documentation about the process of developing a project from the beginning.
I’ll try to be as clear as I can and document each choice I make to make some sense of this in the end.
I think doing this could:
Keep me busy, making me think about something else.
Be an interesting challenge to solve.
Make me learn something new.
Let me experiment on things.
Make my coding skills better.
Help somebody who’s curious about anything I’ll talk about here.
First things first!
Well I like to do code while listening to music, so the first thing to do is finding something to listen to.
Getting back home from work I was thinking about the record I.V. by the band Loma Prieta.
I don’t have it on my phone so the choice it’s pretty easy on what to listen to for me, you can buy it by clicking on the links.
Here’s the player from bandcamp if you want to check them out:
What do I want to do?
Programming basically consists of finding ways to solve problems and make a computer do it for you in the best way possible.
What I want to do is to keep track of when I walk and calculate statistics to see how things are going.
That’s basically it for now, later on I’ll try to analyze this in more details and try to find a solution each subproblem to come up with something that would work for me.
Decisions, decisions, decisions…
How to write it?
I like the Java programming language, I also use it every day at my job, so the choice for me it’s pretty easy, using it 🙂
How to call it?
Well this should keep track of my walks and do statistics on them, why not calling it walk-stats?
Sounds reasonable, and it’s not already taken, so be it, welcome walk-stats.
How to release it?
I’m a pretty strange person, I’m a bit of a misanthropist, but I still believe that helping someone who needs it (and while programming you came across a lot of challenges) it’s a nice thing to do.
I also think that more people looking and collaborating at something would make it better.
So I’m releasing the code for this project with the BSD 2-clause license, basically, do whatever you want with this program as long as you keep the license for the code I wrote in source and binary form.
Analysing the problem a bit more in depth
A nice way to attack and solve a problem it’s dividing it in smaller subproblems, as a lot of people said before: divide et impera, it worked then, and still works today.
So from keep track of when I walk and calculate statistics on it, it’s easy to divide it into 2 smaller problems:
Keep track of when I walk.
Calculate statistics on it.
This is helpful because I can focus on the first problem first and move on with the second part later.
Keep track of when I walk
Questions? Answers!
How can I record data from a walk?
Well, I don’t feel like writing a full pledged gps logger application for my Android phone, I just want to aggregate the data in a unique place and make some computations about it, so Logger GPS for Android would sure do.
With it I can save data in the GPX format, which is pretty cool.
What’s the data I need to save about each walk?
For now, without worrying too much about it I guess I need to save:
The date and time I was walking
The actual data GPS positions from the walk
Where can I store that data to make it easily accessible and usable?
Probably in a database, where I can structure the data and query it.
How do I want to see the data?
Well it would be cool to see the actual map with the track on it, so I’ll try to keep it an option. But it’s good enough to see the numbers too as the first release.
Calculate statistics on the data
Other questions and answers
What do I need to compute from the saved data?
It should be useful to see:
Total time.
Total distance.
Average speed.
Maximum instantaneous speed.
All of this also from all walks together. (this should be be easy from the single aggregated data).
How do I want to see the data?
Again, graphically a graph would be cool, I’m not a graphic so I would keep that in mind, but just the raw data it’s good enough for the first release.
Let’s start setting up the project
Distributed version control system for the code
I think it’s important to keep the code under version control, it helps focusing on what you’re doing, and all the others nice things like distributed development, versioning, history, rollbacks and so on.
I like git, my code is open so I will use github as the public repository for this project.
I came across a funny issue on utils (available here) today, basically 2 unit tests were not executed by Apache Maven on Travis CI.
It’s funny beacause it happened to me before, so I knew how to fix this problem.
On my machine I usually run JUnit tests with the JUnit plugin integrated into the Eclipse IDE because it’s nice, green/red, failure log, stacktrace and stuff.
Instead, when calling from the command line mvn test, Maven uses the maven-surefire-plugin to execute the tests. In its documentation it says that the default configuration, which I can’t be bothered to change, is to pick up every file name that matches this expressions:
**/Test*.java
**/*Test.java
**/*TestCase.java
A typo like NullCheckerTests, instead of NullCheckerTest prevents the tests in the class from being executed because the class it’s just ignored during test execution.
The solution it’s easy, following naming conventions, I think it’s nice to call all my test with an ending *Test in the name of the file and class, after all if you’re declaring an xxx test class, so it should be called XxxTest in a file named XxxTest.java.
An example of the problem and the relative solution can be found here.
I thought that sharing this issue could be useful if anybody encountered the same problem.
Long time, no see.. It’s been a very busy year to say the least.
I always liked to solve problems, to write code and experiment with stuff, so as you do, I developed some personal projects to try out new things.
I usually develop in Java, using Apache Maven as my build and dependency management tool, in my spare time and at my job too. I’ve noticed that I usually keep my general purpose utilities classes under packages like *.utils or *.helper.
This led to a lot of copy-pasted code all over the place. A lot of methods were also untested. I couldn’t even be bothered to look inside the other projects if there was already what I needed, so I ended up re-writing already existent stuff, that’s for sure.
I finally decided that I’m done with this mess.
I started a project called utils, and I choose that it should be open source and available under the BSD 3-Clause License.
The source code is hosted on GitHub and I put the project under continuous integration testing with a service called Travis CI. I use another service called Codacy that provides automated code analysis. I also discovered another service called JitPack looking around for a quick way to share my artifacts online. The home page of JitPack reads “Easy to use package repository for Git” and I can say that’s really great! It uses maven as the build tool, provides artifacts for sources/javadoc and it’s integrated with GitHub release system (just tag your code on git and you’re good to go basically, artifacts are online usually the order of seconds).
All this services are free for open source and it’s a great technological stack to write good code, check them out.